Современная форма с html5 и CSS3

Привет всем, и урок снова про форму регистрации. Теперь вместе с jQuery используем возможности html5 и css3. Форма будет действительно современной.
HTML
Здесь мы используем HTML5 код:
<div id="registration">
 <h2>Создать аккаунт</h2>

 <form id="RegisterUserForm" action="" method="post">
     <fieldset>
         <p>
            <label for="name">Имя</label>
            <input id="name" name="name" type="text" class="text" value="" />
         </p>

         <p>
            <label for="tel">Телефон</label>
            <input id="tel" name="tel" type="tel" class="text" value="" />
         </p>

         <p>
            <label for="email">Электронный почтовый адрес</label>
            <input id="email" name="email" type="email" class="text" value="" />
         </p>

         <p>
            <label for="password">Пароль</label>
            <input id="password" name="password" class="text" type="password" />
         </p>

         <p><input id="acceptTerms" name="acceptTerms" type="checkbox" />
            <label for="acceptTerms">
                Я соглашаюсь с <a href="">Условиями</a> и <a href="">Правилами конфиденциальности</a>
            </label>
         </p>

         <p>
            <button id="registerNew" type="submit">Регистрация</button>
         </p>
     </fieldset>

 </form>
</div>
Обратите внимание на типы (type) полей input. Помимо использования обычных "name" и "password", мы также используем "tel" и "email". Большинство браузеров никак на это не отреагируют, а вот для пользователей мобильного Safari (в iPhone и IPad - кстати в этом году продажи телефонов apple (около 25 млн.) впервые превысили продажи nokia) это имеет большое значение. Основное различие заключается в смене виртуальной клавиатуры под тип вводимых данных. Для email добавляется знак @, смотрите картинку ниже. Конечно это не так важно, но пользователи мобильного safari будут вам благодарны за такую внимательность к деталям.
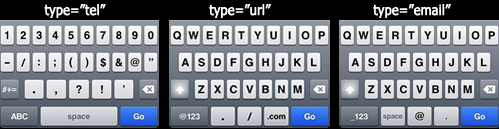
Старые браузеры, которые не понимают формы html5, будут возвращать тип text. Что неплохо, для наших целей. Кроме того, каждое поле имеет класс text, чтобы мы смогли офрмить их в CSS обратившись к ним через селектор input.text.
CSS
Вот полный код стилей:
Начинается простым ресетом стилей, далее стилизуется форма регистрации, где используем css3 градиент для фона с учетом типа браузеров.
Вы можете использовать вот этот сайт для генерирования собственных градиентов. Добавляем круглые углы и тень для текста.
Для оформления полей input также используем градиент и круглые углы.
Потом добавляем иконки для полей ввода через background. Иконки сделаны спрайтами поэтому определяем background-position для каждой иконки в зависимости от типа поля input.
Для кнопки submit - Зарегистрироваться, так же используем спрайт в трех состояниях: :link, :hover, :active.
/* Add whatever you need to your CSS reset */
html, body, h1, form, fieldset, input {
  margin: 0;
  padding: 0;
  border: none;
  }

body { font-family: Helvetica, Arial, sans-serif; font-size: 12px; }

        #registration {
            color: #fff;
            background: #2d2d2d;
            background: -webkit-gradient(
                            linear,
                            left bottom,
                            left top,
                            color-stop(0, rgb(60,60,60)),
                            color-stop(0.74, rgb(43,43,43)),
                            color-stop(1, rgb(60,60,60))
                        );
            background: -moz-linear-gradient(
                            center bottom,
                            rgb(60,60,60) 0%,
                            rgb(43,43,43) 74%,
                            rgb(60,60,60) 100%
                        );
            -moz-border-radius: 10px;
            -webkit-border-radius: 10px;
            border-radius: 10px;
            margin: 10px;
            width: 430px;
            }

 #registration a {
      color: #8c910b;
      text-shadow: 0px -1px 0px #000;
      }

#registration fieldset {
      padding: 20px;
      }

input.text {
      -webkit-border-radius: 15px;
      -moz-border-radius: 15px;
      border-radius: 15px;
      border:solid 1px #444;
      font-size: 14px;
      width: 90%;
      padding: 7px 8px 7px 30px;
      -moz-box-shadow: 0px 1px 0px #777;
      -webkit-box-shadow: 0px 1px 0px #777;
      background: #ddd url('img/inputSprite.png') no-repeat 4px 5px;
      background: url('img/inputSprite.png') no-repeat 4px 5px, -moz-linear-gradient(
           center bottom,
           rgb(225,225,225) 0%,
           rgb(215,215,215) 54%,
           rgb(173,173,173) 100%
           );
      background:  url('img/inputSprite.png') no-repeat 4px 5px, -webkit-gradient(
          linear,
          left bottom,
          left top,
          color-stop(0, rgb(225,225,225)),
          color-stop(0.54, rgb(215,215,215)),
          color-stop(1, rgb(173,173,173))
          );
      color:#333;
      text-shadow:0px 1px 0px #FFF;
}

 input#email {
     background-position: 4px 5px;
    background-position: 4px 5px, 0px 0px;
    }

 input#password {
     background-position: 4px -20px;
    background-position: 4px -20px, 0px 0px;
    }

 input#name {
     background-position: 4px -46px;
    background-position: 4px -46px, 0px 0px;
    }

 input#tel {
     background-position: 4px -76px;
    background-position: 4px -76px, 0px 0px;
    }

#registration h2 {
    color: #fff;
    text-shadow: 0px -1px 0px #000;
    border-bottom: solid #181818 1px;
    -moz-box-shadow: 0px 1px 0px #3a3a3a;
    text-align: center;
    padding: 18px;
    margin: 0px;
    font-weight: normal;
    font-size: 24px;
    font-family: Lucida Grande, Helvetica, Arial, sans-serif;
    }

#registerNew {
    width: 203px;
    height: 40px;
    border: none;
    text-indent: -9999px;
    background: url('img/createAccountButton.png') no-repeat;
    cursor: pointer;
    float: right;
    }

    #registerNew:hover { background-position: 0px -41px; }
    #registerNew:active { background-position: 0px -82px; }

 #registration p {
      position: relative;
      }

fieldset label.infield /* .infield label added by JS */ {
    color: #333;
    text-shadow: 0px 1px 0px #fff;
    position: absolute;
    text-align: left;
    top: 3px !important;
    left: 35px !important;
    line-height: 29px;
    }
Начинается простым ресетом стилей, далее стилизуется форма регистрации, где используем css3 градиент для фона с учетом типа браузеров.
Вы можете использовать вот этот сайт для генерирования собственных градиентов. Добавляем круглые углы и тень для текста.
Для оформления полей input также используем градиент и круглые углы.
Потом добавляем иконки для полей ввода через background. Иконки сделаны спрайтами поэтому определяем background-position для каждой иконки в зависимости от типа поля input.
Для кнопки submit - Зарегистрироваться, так же используем спрайт в трех состояниях: :link, :hover, :active.
JS
Не забываем, как обычно, подключить библиотеку jQuery в шапке страницы.
Для дальнейшего оформления формы мы используем перемещение label внутрь поля. В нашем случае методика базируется на работе Тревора Дэвиса из Виджет Лабс.
А вот так выглядит форма в internet explorer 8.
Для дальнейшего оформления формы мы используем перемещение label внутрь поля. В нашем случае методика базируется на работе Тревора Дэвиса из Виджет Лабс.
<script type="text/javascript">

 $(document).ready(function() {
/*
* In-Field Label jQuery Plugin
* http://fuelyourcoding.com/scripts/infield.html
*
* Copyright (c) 2009 Doug Neiner
* Dual licensed under the MIT and GPL licenses.
* Uses the same license as jQuery, see:
* http://docs.jquery.com/License
*
* @version 0.1
*/
(function($) { $.InFieldLabels = function(label, field, options) { var base = this; base.$label = $(label); base.$field = $(field); base.$label.data("InFieldLabels", base); base.showing = true; base.init = function() { base.options = $.extend({}, $.InFieldLabels.defaultOptions, options); base.$label.css('position', 'absolute'); var fieldPosition = base.$field.position(); base.$label.css({ 'left': fieldPosition.left, 'top': fieldPosition.top }).addClass(base.options.labelClass); if (base.$field.val() != "") { base.$label.hide(); base.showing = false; }; base.$field.focus(function() { base.fadeonfocus(); }).blur(function() { base.checkForEmpty(true); }).bind('keydown.infieldlabel', function(e) { base.hideonchange(e); }).change(function(e) { base.checkForEmpty(); }).bind('onPropertyChange', function() { base.checkForEmpty(); }); }; base.fadeonfocus = function() { if (base.showing) { base.setOpacity(base.options.fadeOpacity); }; }; base.setOpacity = function(opacity) { base.$label.stop().animate({ opacity: opacity }, base.options.fadeDuration); base.showing = (opacity > 0.0); }; base.checkForEmpty = function(blur) { if (base.$field.val() == "") { base.prepForShow(); base.setOpacity(blur ? 1.0 : base.options.fadeOpacity); } else { base.setOpacity(0.0); }; }; base.prepForShow = function(e) { if (!base.showing) { base.$label.css({ opacity: 0.0 }).show(); base.$field.bind('keydown.infieldlabel', function(e) { base.hideonchange(e); }); }; }; base.hideonchange = function(e) { if ((e.keyCode == 16) || (e.keyCode == 9)) return; if (base.showing) { base.$label.hide(); base.showing = false; }; base.$field.unbind('keydown.infieldlabel'); }; base.init(); }; $.InFieldLabels.defaultOptions = { fadeOpacity: 0.5, fadeDuration: 300, labelClass: 'infield' }; $.fn.inFieldLabels = function(options) { return this.each(function() { var for_attr = $(this).attr('for'); if (!for_attr) return; var $field = $("input#" + for_attr + "[type='text']," + "input#" + for_attr + "[type='password']," + "input#" + for_attr + "[type='tel']," + "input#" + for_attr + "[type='email']," + "textarea#" + for_attr); if ($field.length == 0) return; (new $.InFieldLabels(this, $field[0], options)); }); }; })(jQuery);

 $("#RegisterUserForm label").inFieldLabels();
});

</script>
А вот так выглядит форма в internet explorer 8.

Ссылки